习惯了在 css 文件里面编写样式,其实JavaScript 的 CSS对象模型也提供了强大的样式操作能力,
那就随文章一起看看,有多少能力是你不知道的吧。
客从八方来, 样式呢, 样式五方来。
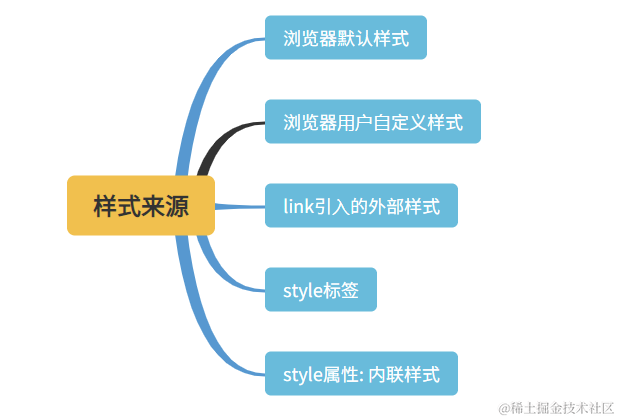
chrome旧版本用户自定义样式目录: %LocalAppData%/Google/Chrome/User Data/Default/User StyleSheets。 新版本已经不支持用户自定义样式。
用户代理样式(浏览器默认样式):

至于字体大小,颜色等等,这些都是浏览器默认样式。
前两种样式我们一般不会去修改,绝大部分场景我们都是在操作后面三种样式。
同一个节点的某个属性可能被定义多次,最后哪个生效呢? 这是有一个优先级规则的。
内联样式 > ID选择器 > 类选择器 > 标签选择器
细心的同学会问,伪类呢, important呢, 答案也很简单
伪类 优先级 同 类选择器
important 你最大
到这里,各位可能都觉得没问题,那来张图:
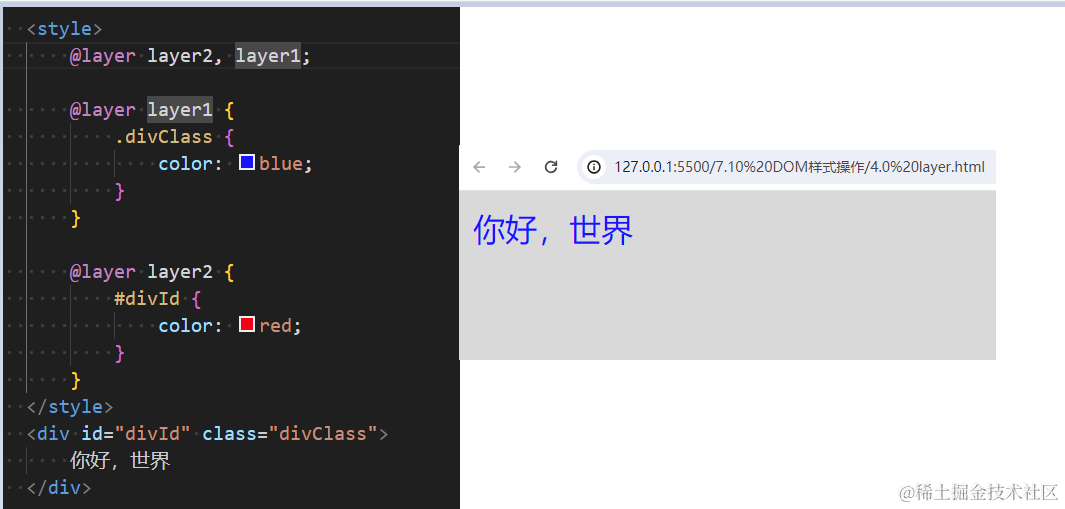
ID选择器 败给了 样式选择器, 这是因为 CSS 新的 layer (级联层) layer1的优先级更高特性导致的, 后续会有专门的文章介绍。
再提个问题: 如果 layer2 修改为 color: red !important, 那又改显示什么颜色呢。
基本知识准备完毕,那就进入下一个阶段。
style属性名是驼峰语法
想到react给style赋值,是不是呵呵一笑了。
    <style>
        .div {
            background-color: red;
            font-size: 30px;
        }
    </style>
    <script>
        const el = document.getElementById("test-div");
        el.style.backgroundColor = "red";
        el.style.fontSize = "30px";
    </script>
style.cssText 批量赋值
important! 也是可以生效的
    <div id="test-div">文本</div>
    <style>
        .div {
            background-color: red;
            font-size: 30px;
        }
    </style>
    <script>
        const el = document.getElementById("test-div");
         el.style.cssText ="background-color: green !important; font-size: 40px;"
    </script>
那可不可以直接把style赋值一个对象呢? 很不幸,style是一个只读属性,虽然你表面能赋值成功,实际没有任何变化。
// 例如
document.body.style = {color:"red"};
另外你也可以通过attributeStyleMap属性来设置style的值:
const buttonEl = document.querySelector("body");
// 更改背景色
buttonEl.attributeStyleMap.set("background-color", 'red');
目前掌握classList的style.cssText的你,是不有点小嘚瑟呢? 这才哪到哪,还有重头戏。
className: 操作的是节点的class属性。
| 属性 | 值 | 方法 |
|---|---|---|
| className | 字符串 | 字符串具备的方法 |
| classList | DOMTokenList 类数组 | add, remove, contains, toggle等 |
没有classList属性之前,我们还需要手动封装类似的方法。 时代的进步真好!
定义: 从列表中删除一个给定的标记 并返回 false 。 如果标记 不存在,则添加并且函数返回 true。
语法: tokenList.toggle(token, force) ;
force参数: 如果force为真,就变为单纯的添加。
用两个按钮分别来演示toggle true和toggle false.
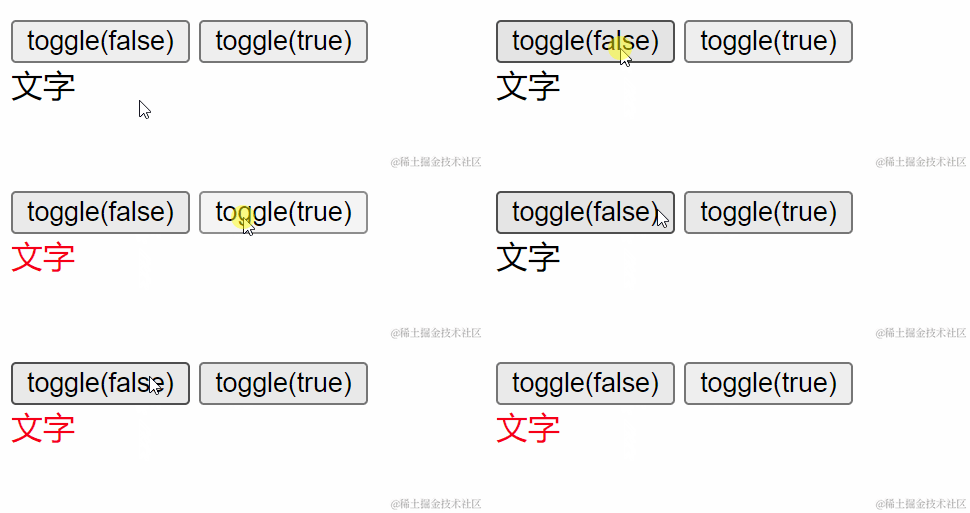
代码如下:
    <div>
        <button type="button" id="btnToggleFalse">toggle(false)</button>
        <button type="button" id="btnToggleTrue">toggle(true)</button>
    </div>

    <div id="container">
        <div>文字</div>
    </div>
    <style>
        .test-div {
            color: red
        }
    </style>

    <script>
        const el = container.firstElementChild;        // toggle false
        btnToggleFalse.addEventListener("click", function () {
            el.classList.toggle("test-div");
        });        // toggle true
        btnToggleTrue.addEventListener("click", function () {
            el.classList.toggle("test-div", true);
        })
    </script>
style标签是不是节点,是,那,就可以为所欲为!!!
<style>
 .div {
    background-color: red;
      font-size: 30px;
 }
</style>
拿到文本内容替换,可不可以,当然是可以的。 剑走偏锋!
  <div>
        <button id="btnReplace" type="button">替换</button>
    </div>
    <div class="div">
        文本
    </div>
    <style id="ss-test">
        .div {
            background-color: red;
            font-size: 30px;
        }
    </style>
    <script>
        const ssEl = document.getElementById("ss-test");
        btnReplace.addEventListener("click", function () {
            ssEl.textContent = ssEl.textContent.replace("background-color: red", "background-color: blue")
        })
    </script>
    <div>
        <button type="button" id="btnAdd">添加style节点</button>
    </div>
    <div class="div">文本</div>

    <script>

        document.getElementById("btnAdd").addEventListener("click", createStyleNode)
        function createStyleNode() {
            const styleNode = document.createElement("style");            // 设置textContent
            // styleNode.textContent = `
            //     .div {
            //         background-color: red;
            //         font-size: 30px;
            //     }
            // `;
            // append
            styleNode.append(`
                 .div {
                     background-color: red;
                     font-size: 30px;
                 }
            `)            document.head.appendChild(styleNode);
        }    </script>
这个就得请专业选手 CSS Object Model 入场, 这是一组允许用JavaScript操纵CSS的API。 它是继DOM和HTML API之后,又一个操纵CSS的接口,从而能够动态地读取和修改CSS样式。
先看关系(不包含 layer)
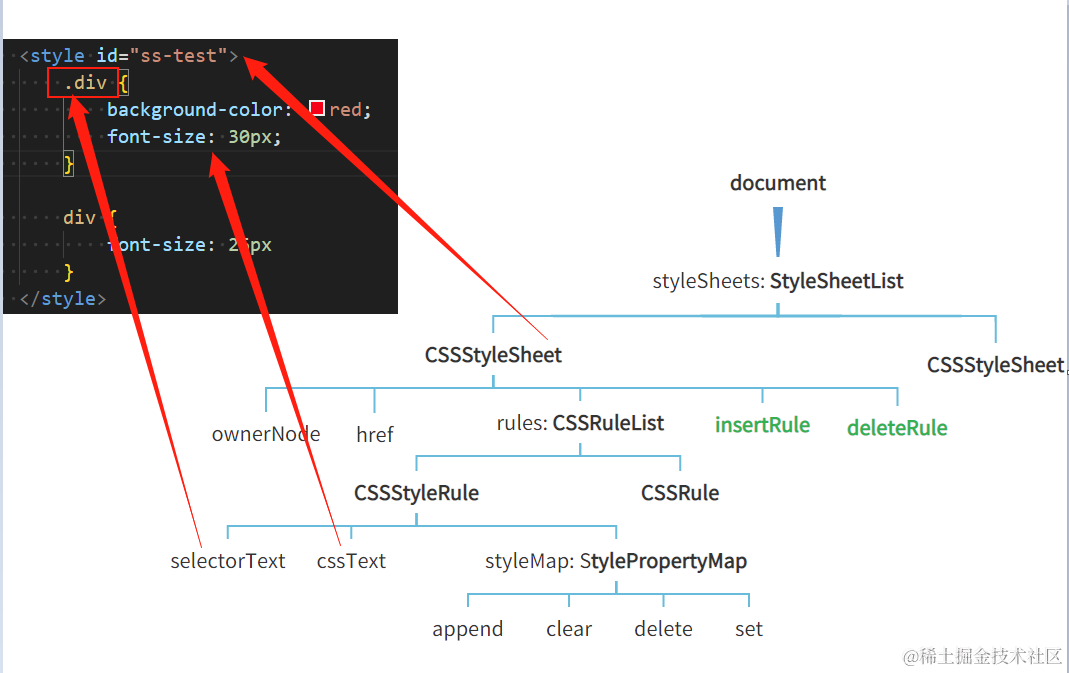
现在就做一件事情,把 .div的backgound-color的值从red修改green。从图上可以看到:
CSSStyleSheet也提供了insertRule和deleteRule的方法
StylePropertyMap提供能操作个规则属性的能力。
先看效果:
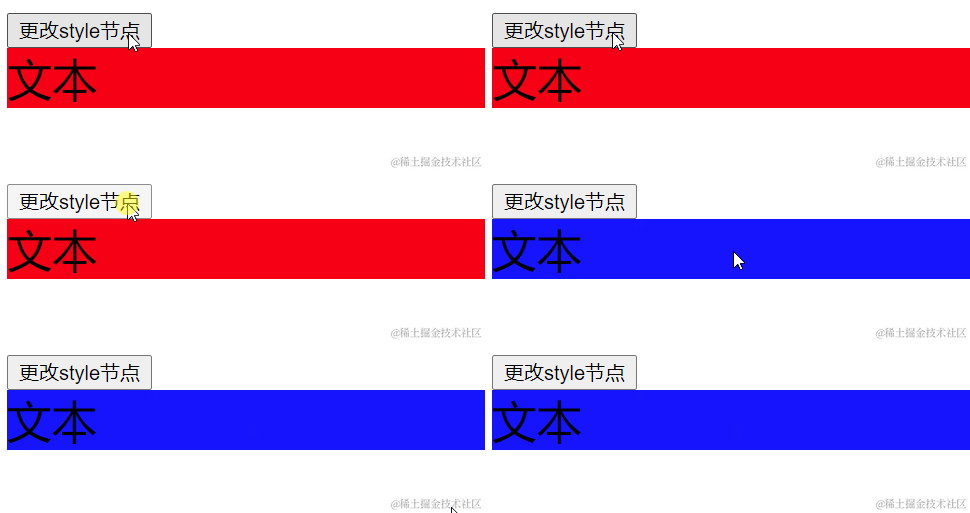
那代码就简单了:
<div>
    <button type="button" id="btnUpdate">更改style节点</button></div><div class="div">文本</div>
        <style id="ss-test">
            .div {
                background-color: red;
                font-size: 30px;
            }
            div {
                font-size: 26px
            }
        </style>
        <script>
            document.getElementById("btnUpdate").addEventListener("click", updateStyleNode)
            function updateStyleNode() {
                const styleSheets = Array.from(document.styleSheets);
                // ownerNode获得styleSheet对应的节点
            const st = styleSheets.find(s=> s.ownerNode.id === "ss-test");
            // 选过选择器找到对应的rule
            const rule = Array.from(st.cssRules).find(r=> r.selectorText === ".div");
            // 兼容性
            const styleMap = rule.styleMap;
            styleMap.set("background-color", "blue");

            }
            </script>
我们首先看一下html页面里面通常是怎么引入样式的。
<link rel="stylesheet" href="http://x.com/c.css">
其本质依旧是节点,所以我们可以动态的创建节点,挂载到文档上即可。
function importCSSByUrl(url){  var link = document.createElement('link');
      link.type = 'text/css';
      link.rel = 'stylesheet';
      link.href = url;      document.head.appendChild(link);
}
那么我们外部引入的CSS,我们也能操作嘛?
答案是肯定的,外面引入的样式最终也会变成一个StyleSheet。 区别在于其href的属性有其全路径, 当然也可以通过 onwerNode的值去识别是link 还是 style方式导入的。
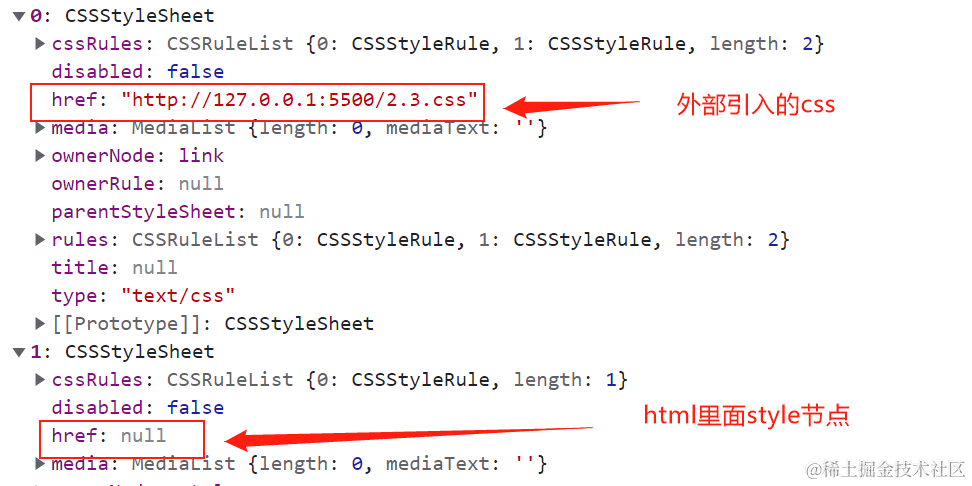
所以,几乎上面的例子,代码只需少量改动。
function updateStyleNode() {    const styleSheets = Array.from(document.styleSheets);    // 通过href判断
    const st = styleSheets.find(s => s.href.endsWith("2.3.css"));    const rule = Array.from(st.rules).find(r => r.selectorText === ".div");    const styleMap = rule.styleMap;
    styleMap.set("background-color", "green");
}
Window.getComputedStyle()方法返回一个对象,该对象在应用活动样式表并解析这些值可能包含的任何基本计算后报告元素的所有CSS属性的值。
let *style* = window.getComputedStyle(*element,* [*pseudoElt*]);
比如font-size属性和transform属性:
效果:
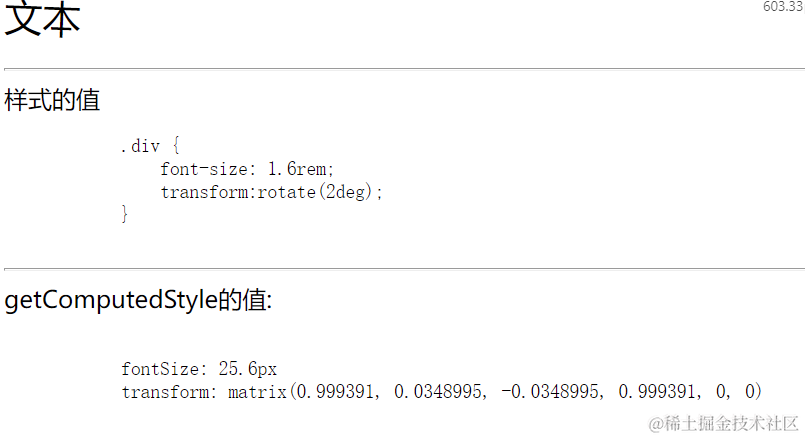
代码:
    <div id="div-test" class="div">
        文本
    </div>
    <hr>
    <div>
        样式的值        <pre>
            .div {
                font-size: 1.6rem;
                transform:rotate(3deg);
            }        </pre>
    </div>
    <hr>
    <div>
        getComputedStyle的值:        <pre id="divGc"></pre>
    </div>
    <style>
        .div {            font-size: 1.6rem;            transform:rotate(3deg);
        }    </style>

    <script>
        const divEl = document.getElementById("div-test");        const styleDeclaration = window.getComputedStyle(divEl);        const fontSize = styleDeclaration.fontSize;        const transform = styleDeclaration.transform;

        divGc.textContent = `
            fontSize: ${fontSize}
            transform: ${transform}
        `
    </script>
获取伪类的样式,就得利用第二个参数
const styleDeclaration = window.getComputedStyle(divEl, "before");
效果:

代码:
    <div id="div-test" class="div">
        文本    </div>

    <hr>
    <div>
        伪类的样式:        <pre id="divGc"></pre>
    </div>
    <style>
        .div:before {            content: '(你好)';            font-size: 1.6rem;
        }    </style>

    <script>
        const divEl = document.getElementById("div-test");        const styleDeclaration = window.getComputedStyle(divEl, "before");        const fontSize = styleDeclaration.fontSize;        const content = styleDeclaration.content;

        divGc.textContent = `
            fontSize: ${fontSize}
            content: ${content}
        `
    </script>
重排:元素的尺寸、结构、或某些属性发生改变时,浏览器重新渲染部分或全部文档的过程称为重排。
重绘: 元素样式的改变并不影响它在文档流中的位置或者尺寸的时候,例如: color, backgound-color, outline-color等,浏览器会重新绘制元素,这个过程称为重绘。
这个在之后可能的加餐中详细说道。
这个是双刃剑。我们通过例子来认知他,动态创建一个create,想让他立马有动画。
下面的代码,没调用 getComputedStyle就不会有动画, 不取值也没有动画
    <div>
        <button id="btnAdd">动态创建节点并动画</button>
    </div>
    <div id="container">
    </div>
    <style>
        .ani {            position: absolute;            width: 50px;            height: 50px;            border-radius: 50%;            background-color: blue;            transition: all 3s;
        }    </style>
    <script>
        btnAdd.addEventListener("click", createAni);        function createAni() {            var div = document.createElement('div')
            div.className = "ani";
            container.appendChild(div);

            div.style.left = "0px";            // 去掉这行代码就不会有动画
            // window.getComputedStyle(div).height
          	// window.getComputedStyle(div) 依旧不会有动画
            div.style.left = "200px"
        }    </script>
我们把样式从内联样式,到style节点(标签),到引入的外部的样式,挨个揍了一遍,一个能打的都没有,还有谁。额,不说了,会的交给你们啦,怎么玩就看你你们啦。
不忘初衷,有所得,而不为所累,如果你觉得不错,你的一赞一评就是我前行的最大动力。